PptxGenJS
Reproduces an HTML table into 1 or more slides (auto-paging).
- Supported cell styling includes background colors, borders, fonts, padding, etc.
- Slide margin settings can be set using options, or by providing a Master Slide definition
Notes:
- CSS styles are only supported down to the cell level (word-level formatting is not supported)
- Nested tables are not supported in PowerPoint, therefore they cannot be reproduced (only the text will be included)
HTML to PowerPoint Syntax
slide.tableToSlides(htmlElementID);
slide.tableToSlides(htmlElementID, { OPTIONS });
HTML to PowerPoint Options (ITableToSlidesOpts)
| Option | Type | Default | Description | Possible Values |
|---|---|---|---|---|
x |
number | 1.0 |
horizontal location (inches) | 0-256. Table will be placed here on each Slide |
y |
number | 1.0 |
vertical location (inches) | 0-256. Table will be placed here on each Slide |
w |
number | 100% |
width (inches) | 0-256. |
h |
number | 100% |
height (inches) | 0-256. |
addHeaderToEach |
boolean | false |
add table headers to each slide | Ex: {addHeaderToEach: true} |
addImage |
string | add an image to each slide | Ex: {addImage: {image: {path: "images/logo.png"}, options: {x: 1, y: 1, w: 1, h: 1}}} |
|
addShape |
string | add a shape to each slide | Use the established syntax | |
addTable |
string | add a table to each slide | Use the established syntax | |
addText |
string | add text to each slide | Use the established syntax | |
autoPage |
boolean | true |
create new slides when content overflows | Ex: {autoPage: false} |
autoPageCharWeight |
number | 0.0 |
character weight used to determine when lines wrap | -1.0 to 1.0. Ex: {autoPageCharWeight: 0.5} |
autoPageLineWeight |
number | 0.0 |
line weight used to determine when tables wrap | -1.0 to 1.0. Ex: {autoPageLineWeight: 0.5} |
colW |
number | table column widths | Array of column widths. Ex: {colW: [2.0, 3.0, 1.0]} |
|
masterSlideName |
string | master slide to use | Slide Masters name. Ex: {master: 'TITLE_SLIDE'} |
|
newSlideStartY |
number | starting location on Slide after initial | 0-(slide height). Ex: {newSlideStartY:0.5} |
|
slideMargin |
number | 1.0 |
margins to use on Slide | Use a number for same TRBL, or use array. Ex: {margin: [1.0,0.5,1.0,0.5]} |
HTML to PowerPoint Table Options
Add an data attribute to the table’s <th> tag to manually size columns (inches)
- minimum column width can be specified by using the
data-pptx-min-widthattribute - fixed column width can be specified by using the
data-pptx-widthattribute
Example:
<table id="tabAutoPaging" class="tabCool">
  <thead>
    <tr>
      <th data-pptx-min-width="0.6" style="width: 5%">Row</th>
      <th data-pptx-min-width="0.8" style="width:10%">Last Name</th>
      <th data-pptx-min-width="0.8" style="width:10%">First Name</th>
      <th data-pptx-width="8.5"     style="width:75%">Description</th>
    </tr>
  </thead>
  <tbody></tbody>
</table>
HTML to PowerPoint Notes
- Your Master Slides should already have defined margins, so a Master Slide name is the only option you’ll need most of the time
- Hidden tables wont auto-size their columns correctly (as the properties are not accurate)
HTML to PowerPoint Examples
// Pass table element ID to tableToSlides function to produce 1-N slides
pptx.tableToSlides("myHtmlTableID");

// Optionally, include a Master Slide name for pre-defined margins, background, logo, etc.
pptx.tableToSlides("myHtmlTableID", { master: "MASTER_SLIDE" });

// Optionally, add images/shapes/text/tables to each Slide
pptx.tableToSlides("myHtmlTableID", {
  addText: { text: "Dynamic Title", options: { x: 1, y: 0.5, color: "0088CC" } },
});
pptx.tableToSlides("myHtmlTableID", {
  addImage: { path: "images/logo.png", x: 10, y: 0.5, w: 1.2, h: 0.75 },
});
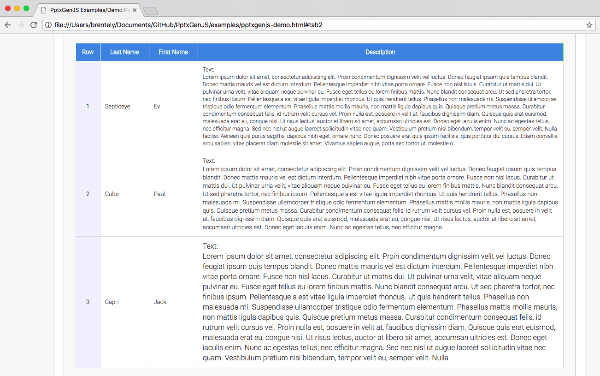
HTML Table

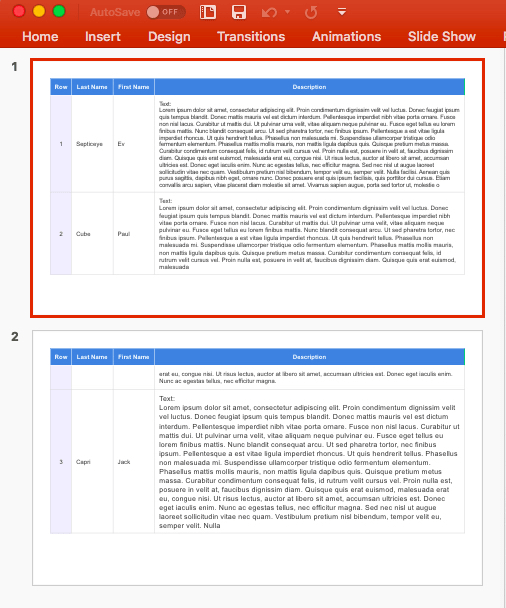
Resulting Slides

Demos
- Working example is available under /demos
HTML to PowerPoint Creative Solutions
Design a Master Slide that already contains: slide layout, margins, logos, etc., then you can produce professional looking Presentations with a single line of code which can be embedded into a link or a button:
Add a button to a webpage that will create a Presentation using whatever table data is present:
<button onclick="{ var pptx=new PptxGenJS(); pptx.tableToSlides('tableId'); pptx.writeFile(); }" type="button">Export to PPTX</button>
SharePoint Integration
Placing a button like this into a WebPart is a great way to add “Export to PowerPoint” functionality
to SharePoint. (You’d also need to add the PptxGenJS bundle <script> in that/another WebPart)